


马丁:我一直认为写博客是对代码的一种兜底行为,能够帮助我们重新审视那些容易被忽略的细枝末节,尤其是在并发、安全、边界等问题上的思考。 比如最开始在设计线程池刷新策略时,并没有考虑并发安全的问题。但在写作过程中深入思考后,意识到这里存在极小概率的并发刷新风险,于是结合 synchronized 与 String#intern() 的机制,引入了基于线程池 ID 维度的锁,确保刷新过程的线程安全。虽然这个问题在实际环境中发生的概率极低极低,但我还是特地拿出来讲一讲,是希望大家在日常开发中也能保持逻辑严谨性,哪怕是对那些边角问题,也要养成主动思考和校验的习惯。
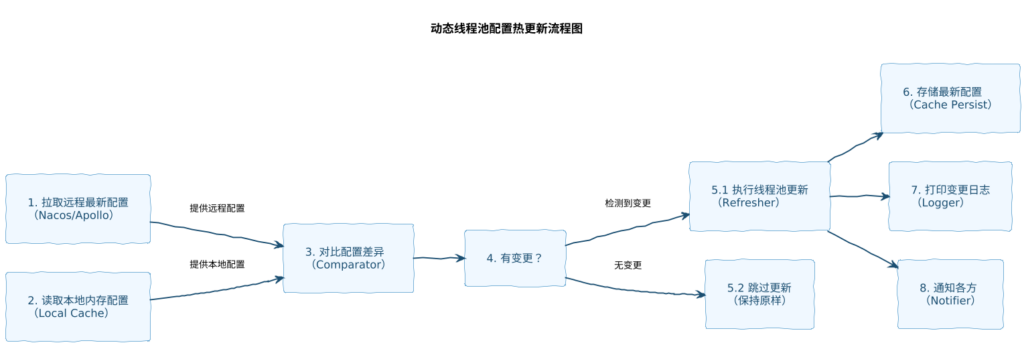
并将对应的字符串序列化为 Java 对象供后续流程使用。接下来会从最新配置和内存中的线程池配置进行比较,如果有变化则更新,没有变化则跳过。
业务时序
动态线程池的核心能力之一,就是运行时可以自动感知配置变化并热更新,无需重启服务。为实现这一能力,我们需要:
- 获取远程最新线程池配置;
- 对比当前内存中已有的线程池配置;
- 如果检测到配置发生变更,则执行更新;
- 存储最新配置,方便下次配置更新时比对;
- 通知各方配置已变更,并打印变更日志。
一、 变更检测的“前哨站”:确保配置刷新的精准性
在动态调整开始之前,系统必须具备极高的敏锐度来判断“是否有必要刷新”。这不仅仅是简单的空值检查,而是一套严谨的比对逻辑。
首先,代码通过 CollUtil.isEmpty 过滤掉无效配置,这是为了防止因配置中心下发空配置导致系统异常。真正的核心在于 hasThreadPoolConfigChanged 方法,它充当了系统性能的守护者。如果每一次心跳或每一次配置推送都无差别地重置线程池,会导致频繁的上下文切换和不必要的系统震荡。
在比对过程中,系统不仅关注核心参数(如 corePoolSize 和 maximumPoolSize),还特别处理了队列容量。这里隐藏着一个深层次的工程细节:原生 JDK 的 LinkedBlockingQueue 的容量(capacity)是 final 修饰的,一旦创建无法修改。因此,代码中引入了 isQueueCapacityChanged 判断逻辑,只有当线程池使用的是自定义的 ResizableCapacityLinkedBlockingQueue 时,才会触发容量变更。这种对“底层实现是否支持”的校验,体现了工业级代码的严谨性,避免了强制修改不支持的队列而引发的内存溢出或逻辑错误。
二、 参数更新的“安全阶梯”:规避 JDK 版本的陷阱
当确认需要刷新后,更新参数的过程并非简单的赋值,而是一场“步步为营”的操作。
最值得关注的是核心线程数(Core)与最大线程数(Max)的更新顺序。在 JDK 8 时代,线程池对这两个参数的修改逻辑相对宽松;但到了 JDK 17 及更高版本,setCorePoolSize 内部增加了一层严格的校验:如果新设置的核心线程数大于当前的最大线程数,会直接抛出 IllegalArgumentException。
为了兼容这种跨版本的行为,代码实现了一种“阶梯式”更新策略:
- 先判断趋势:如果新的核心线程数大于当前的旧最大值,必须先调大最大线程数,开辟上限空间,再提升核心线程数。
- 反向逻辑:如果要调小参数,则需要先压缩核心线程数,再降低最大值。
这种“先扩容后提核”或“先降核后缩容”的逻辑,是解决线上动态刷新导致服务崩溃的关键细节,也是开发者从“会用线程池”到“精通线程池治理”的进阶标志。
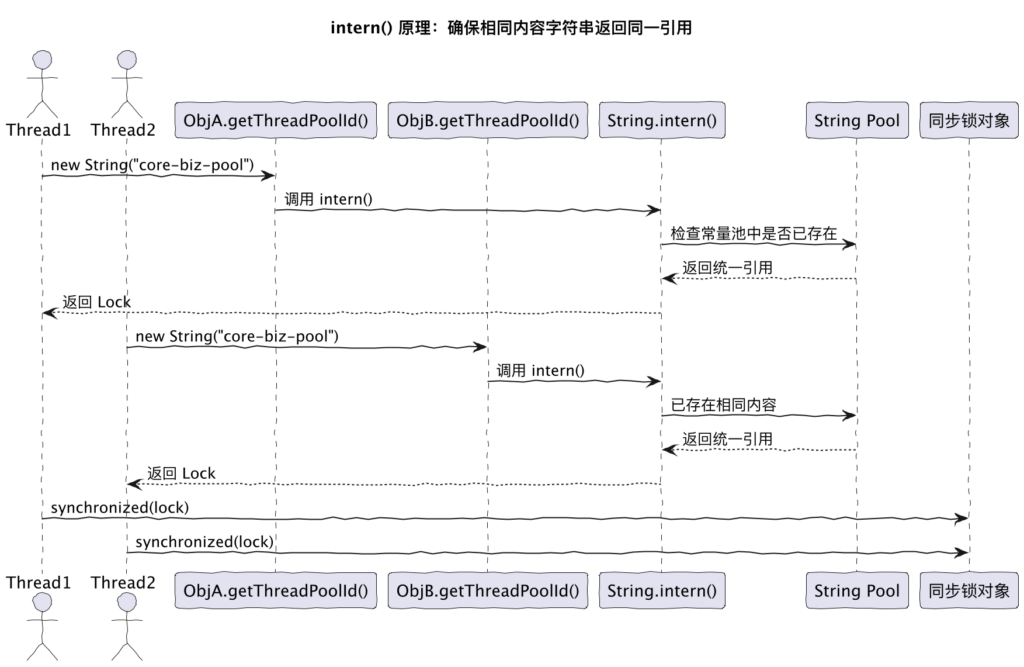
三、 核心灵魂:利用 String.intern() 实现精准的并发锁
在多线程环境下,如果多个配置推送同时到达,或者由于网络抖动导致重复推送,如何保证同一个线程池的刷新操作是原子的、串行的?这是图片展示的重点所在。
1. 锁的困境:为什么不能直接锁字符串?
在 Java 中,当配置中心将配置下发给应用程序时,解析出来的 threadPoolId(如 "core-biz-pool")在内存中通常是重新 new 出来的 String 对象。
如图片左侧所示,Thread1 和 Thread2 各自通过 new String("core-biz-pool") 获取了一个对象。虽然它们的内容完全一样,但它们在堆内存中的引用地址不同。如果你直接使用 synchronized(threadPoolId),那么 Thread1 锁的是对象 A,Thread2 锁的是对象 B。两个线程会同时进入临界区,导致配置覆盖冲突、日志打印错乱等并发问题。
2. String.intern() 的破局之道
图片的中部详细展示了 intern() 的奇妙作用。当 Thread1 调用 threadPoolId.intern() 时,JVM 会去“字符串常量池(String Pool)”中查找。
- 如果池中没有这个内容,就把它放进去并返回引用;
- 如果已经有了,就直接返回池中那个唯一对象的引用。
观察图片的流转:Thread1 调用 intern() 后获取了池中的“统一引用”;紧接着 Thread2 也调用 intern(),虽然它手里的原始对象是新 new 的,但 intern() 迫使它也指向了池中同一个“统一引用”。
3. 实现“颗粒度级”的并发安全
通过这种机制,Thread1 和 Thread2 最终都在同一个内存对象(即图中的“同步锁对象”)上排队。这种做法的精妙之处在于:
- 内容锁定:它不是锁定整个方法,也不是锁定整个 Map,而是针对具体的
threadPoolId进行锁定。 - 互不干扰:如果你同时在刷新 "Order-Pool" 和 "User-Pool",这两个操作会并行执行,因为它们的
intern()引用不同。但如果你在并发刷新同一个 "Order-Pool",它们就会乖乖地串行。 - 低开销:相比于维护一个复杂的
ConcurrentHashMap<String, ReentrantLock>并需要处理锁的生命周期(何时移除不再使用的 ID),intern()利用了 JVM 原生的常量池管理机制,既轻量又高效。
基于你提供的项目结构和之前的原理分析,要实现一个完整的、健壮的动态线程池组件,我们需要在多个模块中“填肉”。
核心逻辑应该遵循:监听配置(Starter) -> 解析配置(Core) -> 锁定ID并比对更新(Core/Refresher) -> 变更后审计与通知(Alarm/Monitor)。
public class LinkedBlockingQueue {
    public class ResizableLinkedBlockingQueue<E> extends AbstractQueue<E> implements BlockingQueue<E>, java.io.Serializable {
        @Serial
        private static final long serialVersionUID = -6903933977591709194L;

        // 链表节点类
        static class Node<E> {
            E item;
            Node<E> next;

            Node(E x) {
                item = x;
            }
        }

        // 容量,使用 volatile 保证可见性,去掉 final 以便修改
        private volatile int capacity;

        // 当前元素个数
        private final AtomicInteger count = new AtomicInteger();

        // 链表头(head.item 永远为 null)
        private transient Node<E> head;
        // 链表尾
        private transient Node<E> last;

        // 取锁(消费者锁)
        private final ReentrantLock takeLock = new ReentrantLock();
        private final Condition notEmpty = takeLock.newCondition();

        // 放锁(生产者锁)
        private final ReentrantLock putLock = new ReentrantLock();
        private final Condition notFull = putLock.newCondition();

        // 构造函数
        public ResizableLinkedBlockingQueue(int capacity) {
            if (capacity <= 0) throw new IllegalArgumentException();
            this.capacity = capacity;
            last = head = new Node<E>(null);
        }

        public ResizableLinkedBlockingQueue() {
            this(Integer.MAX_VALUE);
        }

        // ================== 核心:动态调整容量方法 ==================

        /**
         * 设置新的容量。
         * 如果新容量 > 旧容量:唤醒等待的生产者。
         * 如果新容量 < 旧容量:不会删除现有数据,但新数据无法插入,直到 size < newCapacity。
         */
        public void setCapacity(int newCapacity) {
            if (newCapacity <= 0) throw new IllegalArgumentException();

            final int oldCapacity = this.capacity;
            this.capacity = newCapacity;

            // 如果是扩容,且之前队列已满(可能导致有线程阻塞在 put 上),需要唤醒它们
            if (newCapacity > oldCapacity) {
                signalNotFull();
            }
        }

        // 唤醒等待插入的线程
        private void signalNotFull() {
            final ReentrantLock putLock = this.putLock;
            putLock.lock();
            try {
                notFull.signalAll();
            } finally {
                putLock.unlock();
            }
        }

        // 唤醒等待获取的线程
        private void signalNotEmpty() {
            final ReentrantLock takeLock = this.takeLock;
            takeLock.lock();
            try {
                notEmpty.signal();
            } finally {
                takeLock.unlock();
            }
        }

        // ================== 队列基本操作辅助方法 ==================

        private void enqueue(Node<E> node) {
            last = last.next = node;
        }

        private E dequeue() {
            Node<E> h = head;
            Node<E> first = h.next;
            h.next = h; // help GC
            head = first;
            E x = first.item;
            first.item = null;
            return x;
        }

        // ================== BlockingQueue 接口实现 ==================

        @Override
        public int size() {
            return count.get();
        }

        @Override
        public int remainingCapacity() {
            return capacity - count.get();
        }

        @Override
        public void put(E e) throws InterruptedException {
            if (e == null) throw new NullPointerException();
            int c = -1;
            Node<E> node = new Node<>(e);
            final ReentrantLock putLock = this.putLock;
            final AtomicInteger count = this.count;

            putLock.lockInterruptibly();
            try {
                // 这里是关键:必须检查 count 是否达到当前的 capacity
                while (count.get() >= capacity) {
                    notFull.await();
                }
                enqueue(node);
                c = count.getAndIncrement();
                // 如果放入后还有空间,继续唤醒其他生产者
                if (c + 1 < capacity)
                    notFull.signal();
            } finally {
                putLock.unlock();
            }
            if (c == 0)
                signalNotEmpty();
        }

        @Override
        public boolean offer(E e, long timeout, TimeUnit unit) throws InterruptedException {
            if (e == null) throw new NullPointerException();
            long nanos = unit.toNanos(timeout);
            int c = -1;
            final ReentrantLock putLock = this.putLock;
            final AtomicInteger count = this.count;

            putLock.lockInterruptibly();
            try {
                while (count.get() >= capacity) {
                    if (nanos <= 0) return false;
                    nanos = notFull.awaitNanos(nanos);
                }
                enqueue(new Node<E>(e));
                c = count.getAndIncrement();
                if (c + 1 < capacity)
                    notFull.signal();
            } finally {
                putLock.unlock();
            }
            if (c == 0)
                signalNotEmpty();
            return true;
        }

        @Override
        public boolean offer(E e) {
            if (e == null) throw new NullPointerException();
            final AtomicInteger count = this.count;
            if (count.get() >= capacity) return false;
            int c = -1;
            Node<E> node = new Node<>(e);
            final ReentrantLock putLock = this.putLock;
            putLock.lock();
            try {
                if (count.get() < capacity) {
                    enqueue(node);
                    c = count.getAndIncrement();
                    if (c + 1 < capacity)
                        notFull.signal();
                }
            } finally {
                putLock.unlock();
            }
            if (c == 0)
                signalNotEmpty();
            return c >= 0;
        }

        @Override
        public E take() throws InterruptedException {
            E x;
            int c = -1;
            final AtomicInteger count = this.count;
            final ReentrantLock takeLock = this.takeLock;

            takeLock.lockInterruptibly();
            try {
                while (count.get() == 0) {
                    notEmpty.await();
                }
                x = dequeue();
                c = count.getAndDecrement();
                if (c > 1)
                    notEmpty.signal();
            } finally {
                takeLock.unlock();
            }
            // 如果之前是满的(c == capacity),现在拿走了一个,可能需要唤醒生产者
            // 注意:因为 capacity 是动态的,这里最好是只要拿走了元素,就尝试唤醒
            // 原生 JDK 实现是 if (c == capacity) signalNotFull();
            // 在动态容量下,建议直接检查,或者简单地只要消费了就尝试唤醒(为了安全起见,虽然有性能损耗)
            if (c == capacity) {
                signalNotFull();
            } else if (c > capacity) {
                // 这种情况发生在缩容后:虽然拿走了一个,但依然比新容量大,暂时不唤醒生产者
            } else {
                // 这种复杂情况建议调用 signalNotFull() 以防死锁,或者保留 JDK 原有的 c == capacity 逻辑
                // 为了适应 setCapacity,我们做一个宽松的判断
                signalNotFull();
            }

            return x;
        }

        @Override
        public E poll(long timeout, TimeUnit unit) throws InterruptedException {
            E x = null;
            int c = -1;
            long nanos = unit.toNanos(timeout);
            final AtomicInteger count = this.count;
            final ReentrantLock takeLock = this.takeLock;

            takeLock.lockInterruptibly();
            try {
                while (count.get() == 0) {
                    if (nanos <= 0) return null;
                    nanos = notEmpty.awaitNanos(nanos);
                }
                x = dequeue();
                c = count.getAndDecrement();
                if (c > 1)
                    notEmpty.signal();
            } finally {
                takeLock.unlock();
            }
            if (c >= capacity) signalNotFull(); // 简化处理,尝试唤醒
            return x;
        }

        @Override
        public E poll() {
            final AtomicInteger count = this.count;
            if (count.get() == 0) return null;
            E x = null;
            int c = -1;
            final ReentrantLock takeLock = this.takeLock;
            takeLock.lock();
            try {
                if (count.get() > 0) {
                    x = dequeue();
                    c = count.getAndDecrement();
                    if (c > 1)
                        notEmpty.signal();
                }
            } finally {
                takeLock.unlock();
            }
            if (c >= capacity) signalNotFull();
            return x;
        }

        @Override
        public E peek() {
            if (count.get() == 0) return null;
            final ReentrantLock takeLock = this.takeLock;
            takeLock.lock();
            try {
                Node<E> first = head.next;
                if (first == null) return null;
                else return first.item;
            } finally {
                takeLock.unlock();
            }
        }

        // ================== Iterator 实现(解决报错的关键) ==================

        @Override
        public Iterator<E> iterator() {
            return new Itr();
        }

        /**
         * 一个简单的线程安全迭代器。
         * 这是一个弱一致性的迭代器,或者为了简单起见,这里实现全锁定的快照迭代会更安全,
         * 但 LinkedBlockingQueue 标准实现通常是弱一致性的。
         * 为了简化代码通过编译,这里实现一个基于全锁定的基础迭代器逻辑。
         */
        private class Itr implements Iterator<E> {
            private Node<E> current;
            private Node<E> lastRet;
            private E currentElement;

            Itr() {
                fullyLock();
                try {
                    current = head.next;
                    if (current != null)
                        currentElement = current.item;
                } finally {
                    fullyUnlock();
                }
            }

            public boolean hasNext() {
                return current != null;
            }

            public E next() {
                fullyLock();
                try {
                    if (current == null) throw new NoSuchElementException();
                    E x = currentElement;
                    lastRet = current;
                    current = current.next;
                    if (current != null)
                        currentElement = current.item;
                    return x;
                } finally {
                    fullyUnlock();
                }
            }

            public void remove() {
                if (lastRet == null) throw new IllegalStateException();
                fullyLock();
                try {
                    Node<E> node = lastRet;
                    lastRet = null;
                    for (Node<E> trail = head, p = trail.next; p != null; trail = p, p = p.next) {
                        if (p == node) {
                            unlink(p, trail);
                            break;
                        }
                    }
                } finally {
                    fullyUnlock();
                }
            }
        }

        // 从链表中断开节点(用于 iterator.remove)
        void unlink(Node<E> p, Node<E> trail) {
            p.item = null;
            trail.next = p.next;
            if (last == p) last = trail;
            if (count.getAndDecrement() == capacity)
                notFull.signal();
        }

        // 辅助锁方法
        void fullyLock() {
            putLock.lock();
            takeLock.lock();
        }

        void fullyUnlock() {
            takeLock.unlock();
            putLock.unlock();
        }

        @Override
        public int drainTo(Collection<? super E> c) {
            return drainTo(c, Integer.MAX_VALUE);
        }

        @Override
        public int drainTo(Collection<? super E> c, int maxElements) {
            if (c == null) throw new NullPointerException();
            if (c == this) throw new IllegalArgumentException();
            if (maxElements <= 0) return 0;
            boolean signalNotFull = false;
            final ReentrantLock takeLock = this.takeLock;
            takeLock.lock();
            try {
                int n = Math.min(maxElements, count.get());
                Node<E> h = head;
                int i = 0;
                try {
                    while (i < n) {
                        Node<E> p = h.next;
                        c.add(p.item);
                        p.item = null;
                        h.next = h;
                        h = p;
                        i++;
                    }
                    return n;
                } finally {
                    if (i > 0) {
                        head = h;
                        signalNotFull = (count.getAndAdd(-i) == capacity);
                    }
                }
            } finally {
                takeLock.unlock();
                if (signalNotFull) signalNotFull();
            }
        }
    }
}
另外一个
@Slf4j
public class ThreadPoolRefresher {

    public static void refresh(ThreadPoolExecutorProperties remoteProps) {
        String threadPoolId = remoteProps.getThreadPoolId();

        // 【关键点】:利用 intern() 确保同一 ID 的并发安全
        synchronized (threadPoolId.intern()) {
            // 1. 从注册中心获取当前运行中的实例
            ThreadPoolExecutorHolder holder = OneThreadRegistry.getHolder(threadPoolId);
            if (holder == null) {
                return;
            }

            ThreadPoolExecutor executor = holder.getExecutor();
            ThreadPoolExecutorProperties originProps = holder.getExecutorProperties();

            // 2. 比对差异
            if (!hasDifference(originProps, remoteProps, executor)) {
                return;
            }

            // 3. 阶梯式修改线程数 (避免 JDK17 的 IllegalArgumentException)
            refreshThreadPoolSize(executor, remoteProps);

            // 4. 修改其他参数:拒绝策略、存活时间等
            if (remoteProps.getKeepAliveTime() != null) {
                executor.setKeepAliveTime(remoteProps.getKeepAliveTime(), TimeUnit.SECONDS);
            }

            // 5. 修改队列容量 (需配合自定义队列)
            refreshQueueCapacity(executor, remoteProps);

            // 6. 更新元数据并记录审计日志
            holder.setExecutorProperties(remoteProps);

            // 3. 修复 LogUtils 报错,直接使用 log.info
            log.info("线程池 {} 配置已更新...", threadPoolId);
        }

    }

    private static void refreshQueueCapacity(ThreadPoolExecutor executor, ThreadPoolExecutorProperties remoteProps) {
        // 实现队列扩容逻辑,例如 ResizableCapacityLinkedBlockingQueue
    }

    private static void refreshThreadPoolSize(ThreadPoolExecutor executor, ThreadPoolExecutorProperties remoteProps) {
        // 实现核心线程与最大线程的安全更新逻辑
    }

    private static <T> boolean isChanged(T before, T after) {
        return after != null && !Objects.equals(before, after);
    }

    private static boolean hasDifference(ThreadPoolExecutorProperties original,
                                         ThreadPoolExecutorProperties remote,
                                         ThreadPoolExecutor executor) {
        return isChanged(original.getCorePoolSize(), remote.getCorePoolSize())
                || isChanged(original.getMaximumPoolSize(), remote.getMaximumPoolSize())
                || isChanged(original.getAllowCoreThreadTimeOut(), remote.getAllowCoreThreadTimeOut())
                || isChanged(original.getKeepAliveTime(), remote.getKeepAliveTime())
                || isChanged(original.getRejectedHandler(), remote.getRejectedHandler())
                || isQueueCapacityChanged(original, remote, executor);
    }

    // 将此方法改为 static,因为类中其他方法都是 static,且它依赖 log (Slf4j生成的log是static的)
    private static boolean hasThreadPoolConfigChanged(ThreadPoolExecutorProperties remoteProperties) {
        String threadPoolId = remoteProperties.getThreadPoolId();
        ThreadPoolExecutorHolder holder = OneThreadRegistry.getHolder(threadPoolId);
        if (holder == null) {
            // 4. 这里使用 log 就不再报错了
            log.warn("No thread pool found for thread pool id: {}", threadPoolId);
            return false;
        }
        ThreadPoolExecutor executor = holder.getExecutor();
        ThreadPoolExecutorProperties originalProperties = holder.getExecutorProperties();

        return hasDifference(originalProperties, remoteProperties, executor);
    }

    // 5. 修正参数顺序:调用处是 (original, remote),这里定义也调整为 (original, remote) 以匹配逻辑
    private static boolean isQueueCapacityChanged(ThreadPoolExecutorProperties originalProperties,
                                                  ThreadPoolExecutorProperties remoteProperties,
                                                  ThreadPoolExecutor executor) {
        Integer remoteCapacity = remoteProperties.getQueueCapacity();
        Integer originalCapacity = originalProperties.getQueueCapacity();
        BlockingQueue<?> queue = executor.getQueue();

        return remoteCapacity != null
                && !Objects.equals(remoteCapacity, originalCapacity)
                && Objects.equals("ResizableCapacityLinkedBlockingQueue", queue.getClass().getSimpleName());
    }
}
NacosCloudRefresherHandlerV1.java添加如下方法
    /*
    public void onReceived(String configInfo) {
        // 1. 使用 parser 模块解析文本(Yaml/Properties)
        List<ThreadPoolExecutorProperties> remoteConfigs = ConfigParserHandler.parse(configInfo);

        // 2. 循环触发刷新
        for (ThreadPoolExecutorProperties properties : remoteConfigs) {
            // 调用 core 模块定义的刷新引擎
            ThreadPoolRefresher.refresh(properties);
        }
    }
    */
    public void onReceived(String configInfo) {
        try {
            // 1. 使用单例实例和正确的参数调用 parseConfig
            // 注意:这里需要传入配置文件类型(如 YAML, PROPERTIES)
            Map<Object, Object> configInfoMap = ConfigParserHandler.getInstance()
                    .parseConfig(configInfo, properties.getConfigFileType());

            // 2. 使用 Spring Boot Binder 将 Map 绑定为 Java Bean 对象
            ConfigurationPropertySource sources = new MapConfigurationPropertySource(configInfoMap);
            Binder binder = new Binder(sources);

            // 绑定到根配置类
            BootstrapConfigProperties refreshedProperties = binder.bind(
                    BootstrapConfigProperties.PREFIX,
                    Bindable.ofInstance(new BootstrapConfigProperties())
            ).get();

            // 3. 获取线程池配置列表并触发刷新
            List<ThreadPoolExecutorProperties> executors = refreshedProperties.getExecutors();
            if (executors != null) {
                for (ThreadPoolExecutorProperties executorProperties : executors) {
                    // 这里建议直接调用你类中已经写好的逻辑,或者调用刷新引擎
                    // 示例:更新单个线程池
                    String threadPoolId = executorProperties.getThreadPoolId();
                    ThreadPoolExecutorHolder holder = OneThreadRegistry.getHolder(threadPoolId);
                    if (holder != null) {
                        updateThreadPoolProperties(holder.getExecutor(), executorProperties);
                        holder.setExecutorProperties(executorProperties);
                    }
                }
            }
        } catch (Exception e) {
            log.error("Failed to parse config in onReceived", e);
        }
}- 第一步 (Core 基础): 完善
ThreadPoolExecutorProperties(定义字段)和ThreadPoolExecutorHolder(定义容器)。 - 第二步 (Core 动态化): 实现
ResizableCapacityLinkedBlockingQueue,这是能动态修改队列容量的前提。 - 第三步 (Core 锁逻辑): 实现
ThreadPoolRefresher,把synchronized(id.intern())写进去,这是你整套方案的“灵魂锁”。 - 第四步 (Spring 联动): 在
spring-base里的BeanPostProcessor实现自动扫描。 - 第五步 (Starter 闭环): 在
NacosCloudRefresherHandlerV1接入监听回调,把整个流程串起来。
通透理解建议:
你可以把 core 想象成一个“中央处理器”,它只管怎么改线程池,且必须保证安全(锁);把 starter 想象成“传感器”,它只管发现环境变化;把 spring-base 想象成“粘合剂”,让 Spring 用户能无感知地使用。
通过 intern() 锁定 threadPoolId 是最巧妙的设计,因为它既保证了同一个线程池不会被乱改,又保证了不同的线程池可以并发修改。如果你在完善代码时发现 ID 获取不到或者锁不住,记得检查 threadPoolId 的生成逻辑。
马哥,有个问题想请教一下,改corePoolSize时,如果新值小于当前活跃线程数,框架是如何处理多余工作线程的?是立即中断吗?还有修改maximumPoolSize时,如果新值小于当前线程总数,框架如何处理的呢?
我看了一下代码,马哥代码直接调用的JDK原生线程池提供的setXX API,源码中对新值小于当前活跃线程数时都是一样的调用interruptIdleWorkers()方法,这个方法只会中断空闲线程,不会影响正在工作的线程。
如果检测到变化,调用线程池刷新方法应用新的配置:
1. 核心 / 最大线程数
线程数更新的原则是:先最大后核心 。如果新核心线程数大于当前最大线程数,必须先调大 maximumPoolSize,否则 JDK 会抛 IllegalArgumentException。
Integer remoteCorePoolSize = remoteProperties.getCorePoolSize();
Integer remoteMaximumPoolSize = remoteProperties.getMaximumPoolSize();
if (remoteCorePoolSize != null && remoteMaximumPoolSize != null) {
    int originalMaximumPoolSize = executor.getMaximumPoolSize();
    if (remoteCorePoolSize > originalMaximumPoolSize) {
        executor.setMaximumPoolSize(remoteMaximumPoolSize);
        executor.setCorePoolSize(remoteCorePoolSize);
    } else {
        executor.setCorePoolSize(remoteCorePoolSize);
        executor.setMaximumPoolSize(remoteMaximumPoolSize);
    }
} else {
    if (remoteMaximumPoolSize != null) {
        executor.setMaximumPoolSize(remoteMaximumPoolSize);
    }
    if (remoteCorePoolSize != null) {
        executor.setCorePoolSize(remoteCorePoolSize);
    }
}
之所以会抛出异常,是因为 JDK17 线程池底层在设置核心线程数时做了参数限制校验 。
public void setCorePoolSize(int corePoolSize) {
    if (corePoolSize < 0 || maximumPoolSize < corePoolSize)
        throw new IllegalArgumentException();
    int delta = corePoolSize - this.corePoolSize;
    this.corePoolSize = corePoolSize;
    if (workerCountOf(ctl.get()) > corePoolSize)
        interruptIdleWorkers();
    else if (delta > 0) {
        // We don't really know how many new threads are "needed".
        // As a heuristic, prestart enough new workers (up to new
        // core size) to handle the current number of tasks in
        // queue, but stop if queue becomes empty while doing so.
        int k = Math.min(delta, workQueue.size());
        while (k-- > 0 && addWorker(null, true)) {
            if (workQueue.isEmpty())
                break;
        }
    }
}
有些同学可能打开自己项目一看,发现代码里并没有相关校验逻辑,这是因为 JDK8并未引入这段线程数的校验机制 。我在开发 Hippo4j 的过程中也曾踩过这个坑,感同身受。
具体可以参考这个 Issue 👉 Hippo4j Issue#1063,里面有详细的分析过程和复现场景。
@Slf4j
@RequiredArgsConstructor
public class OneThreadBeanPostProcessor implements BeanPostProcessor {

    private final BootstrapConfigProperties properties;

    @Override
    public Object postProcessAfterInitialization(Object bean, String beanName) throws BeansException {
        if (bean instanceof OneThreadExecutor) {
            DynamicThreadPool dynamicThreadPool;
            try {
                // 通过 IOC 容器扫描 Bean 是否存在动态线程池注解
                dynamicThreadPool = ApplicationContextHolder.findAnnotationOnBean(beanName, DynamicThreadPool.class);
                if (Objects.isNull(dynamicThreadPool)) {
                    return bean;
                }
            } catch (Exception ex) {
                log.error("Failed to create dynamic thread pool in annotation mode.", ex);
                return bean;
            }

            OneThreadExecutor oneThreadExecutor = (OneThreadExecutor) bean;
            // 从配置中心读取动态线程池配置并对线程池进行赋值
            ThreadPoolExecutorProperties executorProperties = properties.getExecutors()
                    .stream()
                    .filter(each -> Objects.equals(oneThreadExecutor.getThreadPoolId(), each.getThreadPoolId()))
                    .findFirst()
                    .orElseThrow(() -> new RuntimeException("The thread pool id does not exist in the configuration."));

            overrideLocalThreadPoolConfig(executorProperties, oneThreadExecutor);

            // 注册到动态线程池注册器,后续监控和报警从注册器获取线程池实例。同时,参数动态变更需要依赖 ThreadPoolExecutorProperties 比对是否有边跟
            OneThreadRegistry.putHolder(oneThreadExecutor.getThreadPoolId(), oneThreadExecutor, executorProperties);
        }

        return bean;
    }

    private void overrideLocalThreadPoolConfig(ThreadPoolExecutorProperties executorProperties, OneThreadExecutor oneThreadExecutor) {
        Integer remoteCorePoolSize = executorProperties.getCorePoolSize();
        Integer remoteMaximumPoolSize = executorProperties.getMaximumPoolSize();
        Assert.isTrue(remoteCorePoolSize <= remoteMaximumPoolSize, "remoteCorePoolSize must be smaller than remoteMaximumPoolSize.");

        // 如果不清楚为什么有这段逻辑,可以参考 Hippo4j Issue https://github.com/opengoofy/hippo4j/issues/1063
        int originalMaximumPoolSize = oneThreadExecutor.getMaximumPoolSize();
        if (remoteCorePoolSize > originalMaximumPoolSize) {
            oneThreadExecutor.setMaximumPoolSize(remoteMaximumPoolSize);
            oneThreadExecutor.setCorePoolSize(remoteCorePoolSize);
        } else {
            oneThreadExecutor.setCorePoolSize(remoteCorePoolSize);
            oneThreadExecutor.setMaximumPoolSize(remoteMaximumPoolSize);
        }

        // 阻塞队列没有常规 set 方法,所以使用反射赋值
        BlockingQueue workQueue = BlockingQueueTypeEnum.createBlockingQueue(executorProperties.getWorkQueue(), executorProperties.getQueueCapacity());
        // Java 9+ 的模块系统(JPMS)默认禁止通过反射访问 JDK 内部 API 的私有字段,所以需要配置开放反射权限
        // 在启动命令中增加以下参数,显式开放 java.util.concurrent 包
        // IDE 中通过在 VM options 中添加参数:--add-opens=java.base/java.util.concurrent=ALL-UNNAMED
        // 部署的时候,在启动脚本(如 java -jar 命令)中加入该参数:java -jar --add-opens=java.base/java.util.concurrent=ALL-UNNAMED your-app.jar
        ReflectUtil.setFieldValue(oneThreadExecutor, "workQueue", workQueue);

        // 赋值动态线程池其他核心参数
        oneThreadExecutor.setKeepAliveTime(executorProperties.getKeepAliveTime(), TimeUnit.SECONDS);
        oneThreadExecutor.allowCoreThreadTimeOut(executorProperties.getAllowCoreThreadTimeOut());
        oneThreadExecutor.setRejectedExecutionHandler(RejectedPolicyTypeEnum.createPolicy(executorProperties.getRejectedHandler()));
    }
    /*
    public Object postProcessAfterInitialization(Object bean, String beanName) {
        if (bean instanceof ThreadPoolExecutor) {
            DynamicThreadPool annotation = AnnotationUtils.findAnnotation(bean.getClass(), DynamicThreadPool.class);
            if (annotation != null) {
                // 自动构建并注册到注册中心
                String threadPoolId = annotation.value();
                OneThreadRegistry.register(threadPoolId, (ThreadPoolExecutor) bean, buildProps(bean));
            }
        }
        return bean;
    }
    */

}
2. 拒绝策略
借助枚举工厂方法把字符串策略名转换为真正的 RejectedExecutionHandler 实例,保证可插拔。
if (remoteProperties.getRejectedHandler() != null &&
        !Objects.equals(remoteProperties.getRejectedHandler(), originalProperties.getRejectedHandler())) {
    RejectedExecutionHandler handler = RejectedPolicyTypeEnum.createPolicy(remoteProperties.getRejectedHandler());
    executor.setRejectedExecutionHandler(handler);
}
3. 队列容量动态扩容
只有当队列实例实现了可扩容接口时才可以修改容量,避免 LinkedBlockingQueue 等 JDK 原生队列不支持容量变化导致的风险。
if (isQueueCapacityChanged(originalProperties, remoteProperties, executor)) {
    BlockingQueue<Runnable> queue = executor.getQueue();
    ResizableCapacityLinkedBlockingQueue<?> resizableQueue = (ResizableCapacityLinkedBlockingQueue<?>) queue;
    resizableQueue.setCapacity(remoteProperties.getQueueCapacity());
}
4. 刷新元数据、发送通知、打印审计日志
线程池运行时参数变更后,还有一些后置逻辑需要处理:
- 1.把最新配置写回注册表,保证后续再读取时就是新的值;
- 2.然后会把“旧值 → 新值”的映射封装成 DTO,通过钉钉、企业微信、邮件等渠道推送给开发 / 运维,做到即时可见。
- 3.为实现日志留痕,会通过
log.info统一打印所有关键字段的 “旧值->新值” 。
代码如下所示:
// 线程池参数变更后进行日志打印String threadPoolId = remoteProperties.getThreadPoolId();ThreadPoolExecutorHolder holder =OneThreadRegistry.getHolder(threadPoolId);ThreadPoolExecutorProperties originalProperties = holder.getExecutorProperties();
holder.setExecutorProperties(remoteProperties);
// 发送线程池配置变更消息通知sendThreadPoolConfigChangeMessage(originalProperties, remoteProperties);
// 打印线程池配置变更日志
log.info(CHANGE_THREAD_POOL_TEXT,
threadPoolId,String.format(CHANGE_DELIMITER, originalProperties.getCorePoolSize(), remoteProperties.getCorePoolSize()),String.format(CHANGE_DELIMITER, originalProperties.getMaximumPoolSize(), remoteProperties.getMaximumPoolSize()),String.format(CHANGE_DELIMITER, originalProperties.getQueueCapacity(), remoteProperties.getQueueCapacity()),String.format(CHANGE_DELIMITER, originalProperties.getKeepAliveTime(), remoteProperties.getKeepAliveTime()),String.format(CHANGE_DELIMITER, originalProperties.getRejectedHandler(), remoteProperties.getRejectedHandler()),String.format(CHANGE_DELIMITER, originalProperties.getAllowCoreThreadTimeOut(), remoteProperties.getAllowCoreThreadTimeOut()));如何保障线程池配置刷新的并发安全?
在动态线程池的配置刷新过程中,我们需要支持多个线程同时触发配置变更(比如配置中心推送受网络影响重复推送、多用户手动调用重复、定时校验等),但必须保证同一个线程池的参数刷新是串行、原子、安全的 。
否则就可能导致:
- 参数错乱:两个线程同时修改 corePoolSize 和 maximumPoolSize,最终值不可预期;
- 日志混乱:原始值和新值打印错位;
- 队列扩容失败:并发修改
ResizableCapacityLinkedBlockingQueue会抛异常; - 不一致性:通知发送和实际线程池状态不一致。
在处理并发安全问题时,我考虑了两种方案:
- 1.对整个方法加锁 :实现最简单,能快速解决线程安全问题;
- 2.仅对指定的线程池ID加锁 :粒度更细,性能更优。
虽然第一种方式实现起来最省事,但独属于程序员的“强迫症”让我不太能接受这种处理方式 。因此,最终我选择了第二种方案,对线程池 ID 维度加锁。
1. 使用 synchronized (id)
代码示例:
synchronized(threadPoolId){// do refresh}存在的问题:
- 如果
threadPoolId是从对象字段获取的(例如.getThreadPoolId()),多个对象即使返回相同内容,也可能是不同的String实例 。 - JVM 会对不同的引用分配不同的锁 → 锁不生效 ,并发冲突依然会发生。
2. 使用 ConcurrentHashMap<String, ReentrantLock>
代码示例:
privatestaticfinalConcurrentMap<String, ReentrantLock> lockMap =newConcurrentHashMap<>();
ReentrantLock lock = lockMap.computeIfAbsent(threadPoolId, k ->newReentrantLock());
lock.lock();try{// do refresh}finally{
lock.unlock();}存在的问题:
- 需要维护锁生命周期,比如什么时候释放锁内存?
- 对于中小项目或轻量组件来说有点“重”。
3. 使用 .intern() 基于内容值构建锁
代码示例:
String threadPoolId = remoteProperties.getThreadPoolId();synchronized(threadPoolId.intern()){// do refresh}优势:
- 任何内容相同的字符串,调用
.intern()后都会返回同一个对象引用 ; - 不依赖外部锁表,零依赖、线程安全 ;
- 锁粒度以线程池 ID 为单位,天然支持并发刷新多个线程池。
3.1 .intern() 原理
.intern() 是 Java 提供的字符串常量池机制 的一部分。
- 它会将当前字符串加入 JVM 的字符串池(String Pool)中;
- 如果字符串池中已有相同内容的字符串,则直接返回那一份对象引用;
- 这就确保了同内容字符串→同引用对象 ,从而让
synchronized生效。
举个例子:
String s1 =newString("abc");String s2 =newString("abc");
System.out.println(s1 == s2);// false,不同引用System.out.println(s1.intern()== s2.intern());// true,intern 后相同引用所以,在做字符串内容级别的同步控制时,只有.intern()能够在不同对象间复用同一锁对象 。
3.2 刷新代码实战
实际代码如下所示:
// 刷新动态线程池对象核心参数for(ThreadPoolExecutorProperties remoteProperties : refresherProperties.getExecutors()){String threadPoolId = remoteProperties.getThreadPoolId();// 以线程池 ID 为粒度加锁,避免多个线程同时刷新同一个线程池synchronized(threadPoolId.intern()){// 检查线程池配置是否发生变化(与当前内存中的配置对比)boolean changed =hasThreadPoolConfigChanged(remoteProperties);if(!changed){continue;}// ......}}3.3 并发单元测试
大家感兴趣可以试试这这个单元测试,分别是加 .intern() 和不加的方案。
importjava.util.concurrent.ExecutorService;importjava.util.concurrent.Executors;publicclassInternFromObjectPropertyTest{publicstaticvoidmain(String[] args){ExecutorService executor =Executors.newFixedThreadPool(5);for(int i =0; i <5; i++){
            executor.submit(()->{// 每个线程构造一个独立对象,但 threadPoolId 内容相同ThreadPoolExecutorProperties props =newThreadPoolExecutorProperties("core-biz-pool");// ❌ 不加 intern:锁失效// Object lock = props.getThreadPoolId();// ✅ 加 intern:同内容,同锁对象Object lock = props.getThreadPoolId().intern();synchronized(lock){String threadName =Thread.currentThread().getName();System.out.printf("[%d] %s 正在刷新线程池 %s%n",System.currentTimeMillis(), threadName, props.getThreadPoolId());try{Thread.sleep(1000);}catch(InterruptedException e){Thread.currentThread().interrupt();}System.out.printf("[%d] %s 刷新完成%n",System.currentTimeMillis(), threadName);}});}

        executor.shutdown();}}@DatapublicclassThreadPoolExecutorProperties{privateString threadPoolId;/**
     * 如果大家对手动 new String(强制创建新对象)有疑惑
     * 可以把这行代码加到动态线程池配置刷新的流程里,查看每一次相同的 threadPoolId HashCode 值是否相同
     * System.out.println(System.identityHashCode(threadPoolId));
     * <p>
     * 因为每次配置中心的字符串都是重新创建的,所以这里为了贴合实际场景,所以是直接 new String
     */publicThreadPoolExecutorProperties(String threadPoolId){// 模拟内容相同,但引用不同this.threadPoolId =newString(threadPoolId);}}


Comments NOTHING